# Database backup, upgrade, and restore
We recommend backing up your database regularly, and especially prior to upgrading Speckle. Backing up a database is often a requirement of a database upgrade, migrating your database between servers, or recovering from an incident.
# TL;DR
Speckle's preferred method of backing up and restoring data in a Postgres database is with pgAdmin (opens new window). This guide assumes you are running Speckle via Docker-Compose, based on our guide.
# Using pgAdmin
# Prerequisites
# For Docker-Compose deployments
- Docker should be installed and running (opens new window).
- We expect you to have followed the instructions for manual installation
# Ensure Postgres and pgAdmin are Running
Determine if pgAdmin is already installed and running. From your terminal window, request the list of running processes from Docker. Full details of this command can be found in Docker's documentation (opens new window).
docker ps --filter name='pgadmin'1If pgAdmin is already running, you should see something like the following output. If so, you can move on to the next section.
CONTAINER ID   IMAGE            COMMAND            CREATED      STATUS          PORTS                              NAMES
04fb5cfc43e9   dpage/pgadmin4   "/entrypoint.sh"   8 days ago   Up 53 minutes   443/tcp, 127.0.0.1:16543->80/tcp   speckle-server-pgadmin-1
1
2Save the following Docker-Compose configuration in a file named
docker-compose-pgadmin.ymlversion: '3' services: pgadmin: image: dpage/pgadmin4 restart: always environment: PGADMIN_DEFAULT_EMAIL: '[email protected]' PGADMIN_DEFAULT_PASSWORD: 'admin' volumes: - pgadmin-data:/var/lib/pgadmin ports: - '127.0.0.1:16543:80' networks: default: name: speckle-server volumes: pgadmin-data:1
2
3
4
5
6
7
8
9
10
11
12
13
14
15
16
17
18
19Start the pgAdmin using Docker-Compose:
docker compose --file docker-compose-pgadmin.yml up --detach1Verify that pgAdmin is now running:
docker ps --filter name='pgadmin'1
# Connecting to pgAdmin
# Connecting to pgAdmin running in Docker on your local machine
Find the port that pgAdmin is being served on using Docker's
pscommand (opens new window).docker ps --filter name='pgadmin'1The above command should produce something like the below. In this example, the port we are interested in is the port exposed on our localhost (
127.0.0.1), this port is5432.CONTAINER ID IMAGE COMMAND CREATED STATUS PORTS NAMES 465897401a96 dpage/pgadmin4 "/entrypoint.sh" 2 hours ago Up 2 hours 443/tcp, 127.0.0.1:16543->80/tcp speckle-server-pgadmin-11
2Open the pgAdmin dashboard (opens new window) in your browser. If you have changed the configuration of pgAdmin, you can find how to access it by running
docker ps --filter name='pgadmin'and making a note of the host and port it is being served on.
# Connecting pgAdmin to Postgres
The user name and password can be found next to
PGADMIN_DEFAULT_EMAILandPGADMIN_DEFAULT_PASSWORDin your configuration file for pgAdmin.- The default values we provided in our
docker-compose-pgadmin.ymlfile are[email protected]and the passwordadmin.
- The default values we provided in our
Click
add new server.
In the dialog box in the
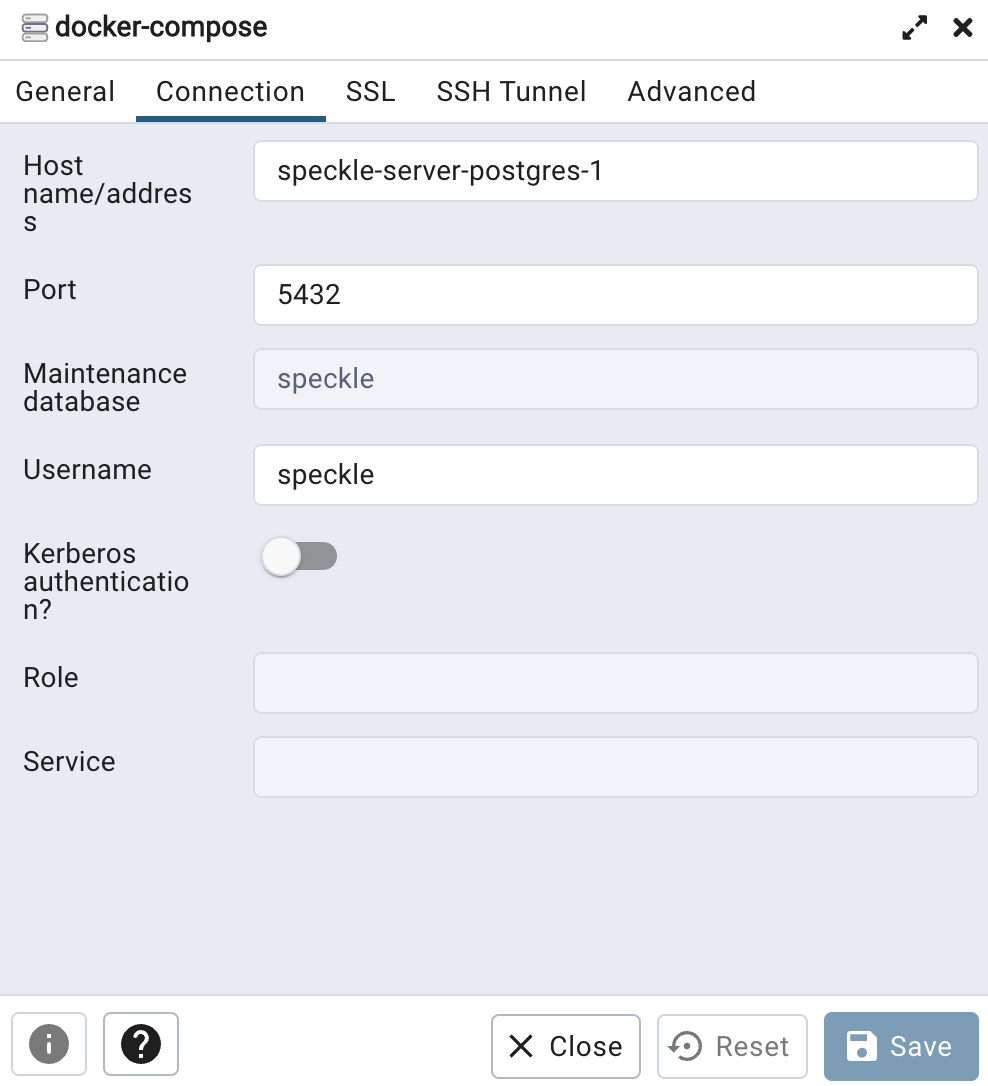
Generaltab, enter the namedocker-compose.In the dialog box in the
Connectiontab:- for the
Host name/addressesenter the name of the Postgres container, in our example it isspeckle-server-postgres-1- the name of the Postgres container can be found with
docker ps --filter name='postgres'
- the name of the Postgres container can be found with
- for
port, use5432(or the value discovered when runningdocker ps --filter name='postgres', see instructions above). - for
database,username, andpassworduse the values in your configuration assigned to the respectivePOSTGRES_DB,POSTGRES_USER, andPOSTGRES_PASSWORDkeys. If installed with Speckle's manual installation, by default the value of these are allspeckle.
- for the
(optional) For some databases, but not the default database provided by Speckle, you may also have to provide a Certificate.
- Copy this certificate into the pgadmin container with
docker cp ./local/path/to/my/certificate.crt speckle-server-pgadmin-1:/var/lib/pgadmin/storage/admin_localhost.com/(assuming the default pgadmin user is[email protected]andspeckle-server-pgadmin-1is the name of the pgAdmin container.) - In the dialog box in the
SSLtab, select the certificate within theRoot Certificateinput.
- Copy this certificate into the pgadmin container with
Click
save.
# Backing-up Postgres
You can now select the database from the browser window (typically found on the left hand side). Expand
docker-composeanddatabasesto select your database. The default database name for Speckle isspeckle.Once you have found the database in pgAdmin, right-click the database name and select
backup.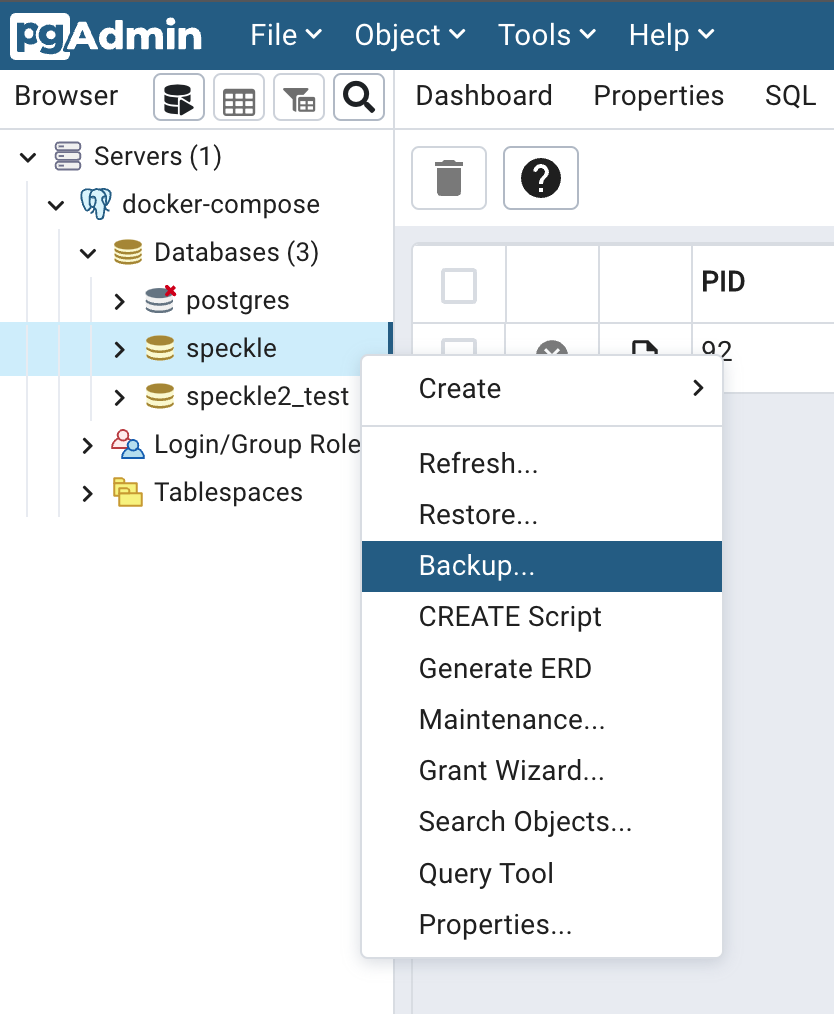
Provide a filename in the
generaltab.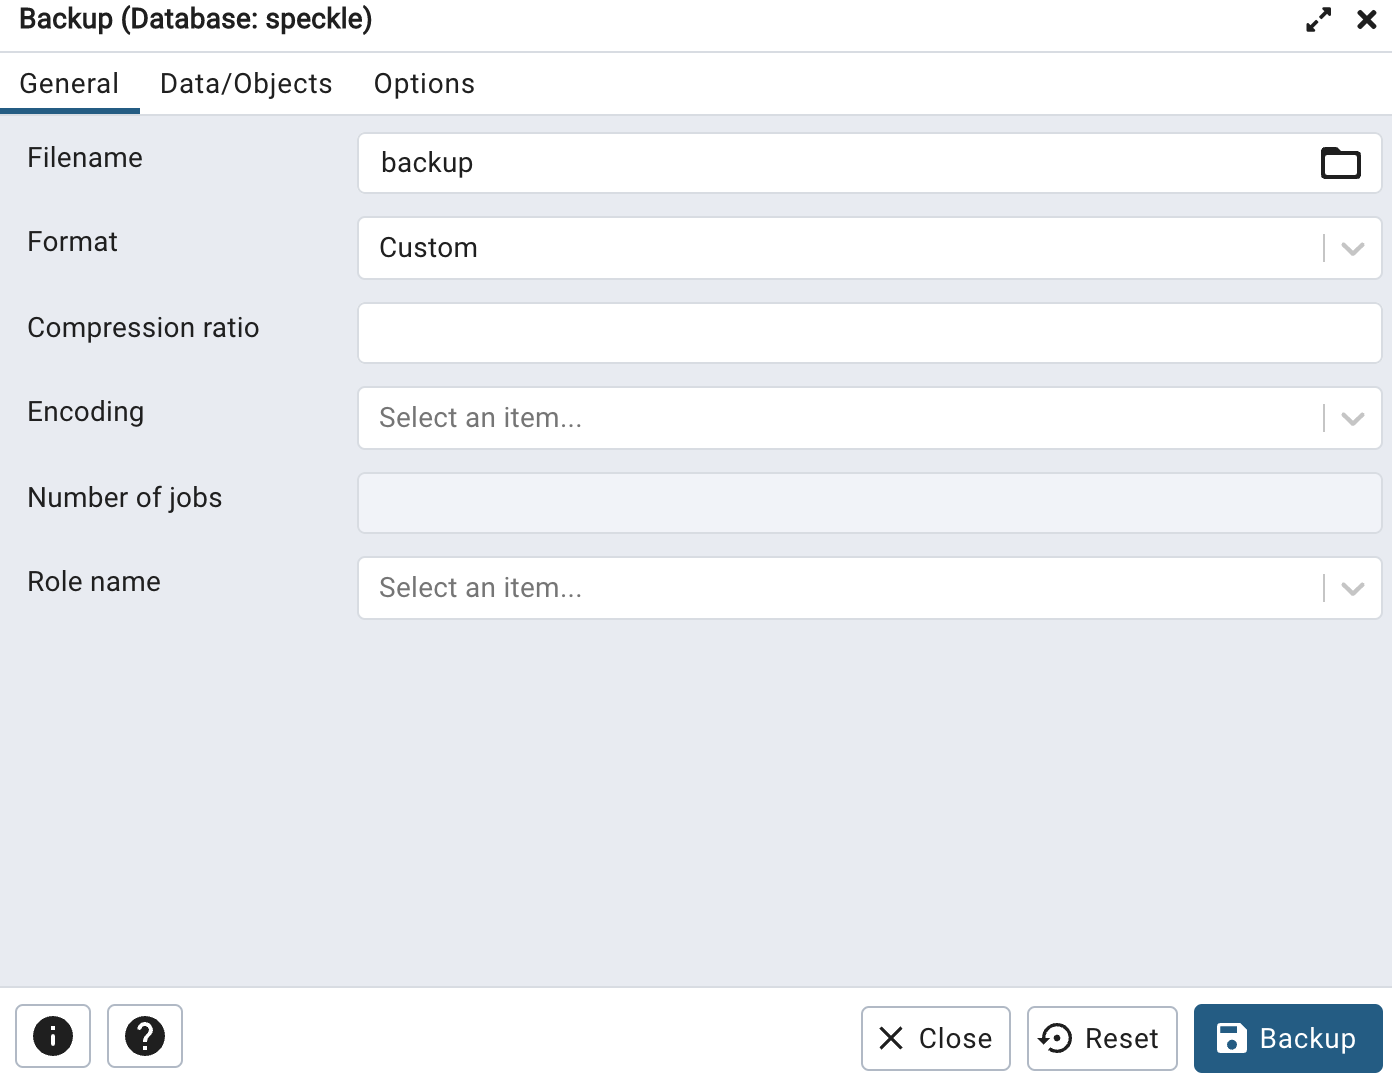
In the
optionstab, select the optionsInclude CREATE DATABASE statementandInclude DROP DATABASE statement.Then start the backup process. This will generate a backup that is stored in the container's volume.
Once the backup is prepared, we now need to save the file to your local machine.
If a
Click to open file locationbutton is displayed (this may depend on the version of pgAdmin running), click on it and download the backup to your machine.If a button is not displayed, you can copy the file from the container to your machine by user docker. Replace
speckle-server-pgadmin-1with the name of your pgAdmin container andBACKUP_FILE_NAMEwith the file name you provided in the pgAdmin dialog.docker cp speckle-server-pgadmin-1:'/var/lib/pgadmin/storage/admin_localhost.com/BACKUP_FILE_NAME' .1If connected via SSH to a DigitalOcean or other virtual or remote machine, you will have to undertake further steps to move the file from the host machine to either your local machine or storage location of your choice. DigitalOcean suggest using
scp(opens new window).
We recommend testing the integrity of the backup at this time. One way of doing this is to install speckle-server on another machine (or modify the name and ports in the file and install a second locally), then upload the backup per the below instructions using pgAdmin. Use pgAdmin or Speckle to check that the information is present.
Store the backup in a safe and secure location. You may wish to copy the backup to multiple secure locations to provide redundancy.
# Backing up a Docker Volume (Optional)
As well as creating a Postgres backup, we also recommend a full Docker volume backup. The Docker volume backup can only be used with the current version of Postgres, so is more limited than the Postgres backup created via pgAdmin (the latter allows us to move data between different versions of Postgres, which is useful when upgrading). Generating an additional backup from the Docker volume provides us with additional confidence that we can recover to a previous good working state.
Find the name of the Postgres database volume.
docker volume ls --filter name='postgres'1Follow the instructions on backing up a Docker Volume in Docker's Documentation (opens new window)
Store the backup in a safe and secure location. You may wish to copy the backup to multiple secure locations to provide redundancy.
If you are not upgrading the Postgres database, you can stop at this step. The following instructions relate only to the event of a major version upgrade of Postgres.
# Preparing Postgres for an upgrade
Determine the name of the Docker container that is running your Postgres database, and the version of Postgres.
docker ps --filter name='postgres'1If successful, the above will print out something similar to the below. In our example the name is
speckle-server-postgres-1and the image version13-alpine.CONTAINER ID IMAGE COMMAND CREATED STATUS PORTS NAMES 510e024a4700 postgres:13-alpine "docker-entrypoint.s…" 2 hours ago Up 2 hours 127.0.0.1:5432->5432/tcp speckle-server-postgres-11
2⚠️ CAUTION This step will cause Speckle, and any other application relying on the database, to stop working until the database is restored. You may wish to notify users of your Speckle server about the disruption to Speckle before proceeding with this and the following steps. Stop your Postgres database with the following command, replacing
speckle-server-postgres-1with the name of your container.docker stop speckle-server-postgres-11Remove the container from docker, this detaches it from its volume and allows the volume to be deleted. Replace
speckle-server-postgres-1with the name of your container.docker rm speckle-server-postgres-11Find the name of the Postgres database volume.
docker volume ls --filter name='postgres'1During upgrades we recommend undertaking a Docker volume backup. This allows us to restore to the previous version if the upgrade was unsuccessful. See the instructions for undertaking a Docker volume backup in the section above.
⚠️ CAUTION This step is destructive and cannot be undone, please ensure that the backup is correct and saved securely before proceeding - see instructions above. Delete the volume storing your Postgres database, replacing
speckle-server_postgres-datawith the name of your Postgres volume.docker volume rm speckle-server_postgres-data1
# Upgrading Postgres
If you installed Postgres using Docker Compose, please log into the machine in which you installed it.
Using
git, clone the Speckle Server repository. More details instructions are available in GitHub's documentation.git clone https://github.com/specklesystems/speckle-server.git1Navigate into the directory of the cloned repository.
cd speckle-server1Check out the version of Speckle Server you wish to deploy. For example, using
giton the command line to checkout a tagged version - in this case Speckle Server version2.9.0(please change to the latest released version (opens new window), or the version you wish to deploy):git checkout tags/2.9.0 -b main1Deploy the docker-compose file with the updated Postgres version:
docker compose -f ./docker-compose-deps.yml up --detach1Verify everything is up and running by viewing the status of all containers:
docker ps1
# Restoring your Data to Postgres from pgAdmin Backup
If connected via SSH to a DigitalOcean or other virtual or remote machine, you will have to undertake steps to move the file your local machine or storage location to the host machine (Droplet). DigitalOcean suggest using
scp(opens new window).Copy the file from the host machine to the pgAdmin container by user Docker. Replace
speckle-server-pgadmin-1with the name of your pgAdmin container andBACKUP_FILE_NAMEwith the file name you provided in the pgAdmin dialog.docker cp BACKUP_FILE_NAME speckle-server-pgadmin-1:'/var/lib/pgadmin/storage/admin_localhost.com/'1Connect to pgAdmin using the instructions above.
Connect pgAdmin to the server using the instructions above.
Right-click
databasesfrom the browser window, and clickcreate. The name of the database should bespeckle.Right-click the created database and click
restore, selecting your previously stored backup. You will need to upload the backup you previously downloaded back into pgAdmin first.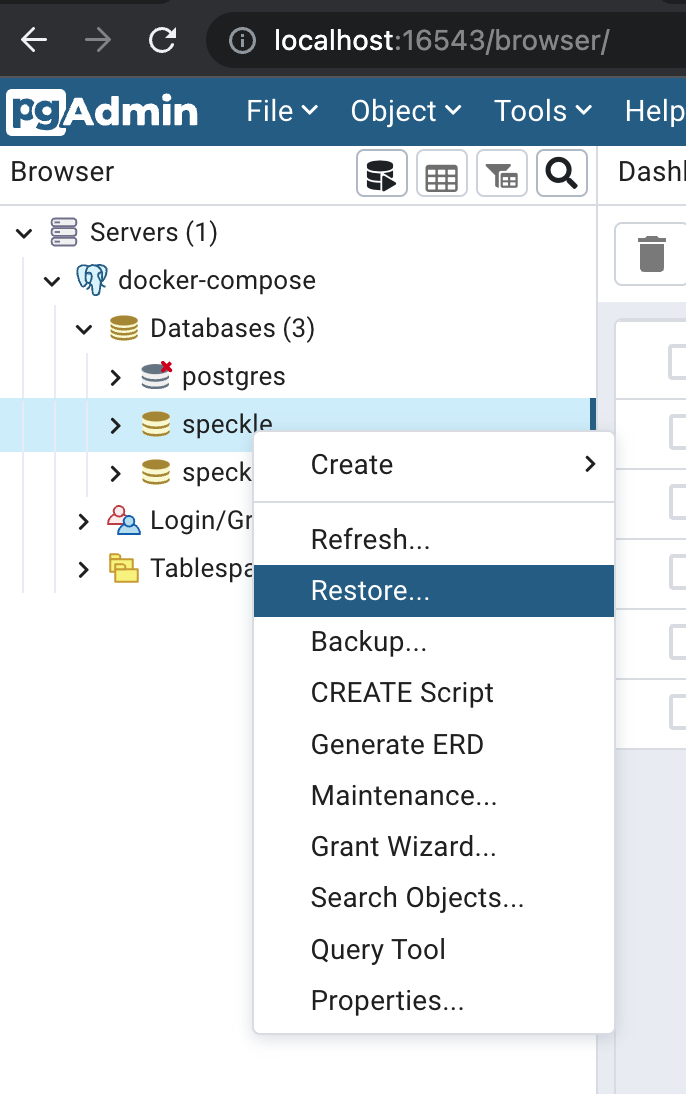
If you encounter errors at this point, it may be because pgAdmin considers the database to be a
maintenance database. To workaround this issue please try the following:- Create another (maybe empty) database.
- Disconnect from the Speckle database.
- Edit server properties for other database.
- On the connection tab set the other database as
Maintenance database. - Reconnect to the Speckle database.
Deploy Speckle server, if not already deployed, and verify the data is correct.
Congratulations! - your data has been backed up, your database has been upgraded, and your data restored. We recommend undertaking the backup steps regularly, even if you are not upgrading your database.