# Dynamo
Speckle's Dynamo Connector currently supports Dynamo versions 2.1 to 2.10 (for Autodesk Revit 2019-2022). All versions of Dynamo Sandbox from 2.1 to 2.10 are also supported.
Please Note!
The Speckle node package is not available from Dynamo's Package Manager. For installation instructions, see the section below.
# Quick Start Video
Prefer watching to reading? Who doesn't!
# Getting Started
TIP
Check out our dedicated tutorial on how to get started with Dynamo (opens new window)!
Our Dynamo Connector takes the form of a node package, which is installed via the Speckle Manager. To install the Dynamo Connector and add your Speckle account, follow the instructions in our Speckle Manager section.

Once installed, the Dynamo Connector will appear as a node package in your library as Speckle 2.
The Speckle 2 package contains the main nodes necessary to use Speckle within Dynamo, including nodes for sending and receiving data, managing streams and selecting accounts.
We've also built a few nodes for more advanced use cases, as well as some handy tools for Speckle developers/hackers (these are found in the Developer Tools sub-section of the package).
# Streams and URLs
Speckle Streams are identified by their URLs. Across our Dynamo and Grasshopper connectors you'll see URLs in 3 different formats:
https://app.speckle.systems/streams/3073b96e86points to themainbranch on Stream3073b96e86https://app.speckle.systems/streams/3073b96e86/branches/devpoints to a branch nameddevon Stream3073b96e86https://app.speckle.systems/streams/3073b96e86/commits/604bea8cc6points to a specific commit604bea8cc6on Stream3073b96e86https://app.speckle.systems/streams/3073b96e86/objects/df7b8bafccefa791d82939dd36541189points to a specific objectdf7b8bafccefa791d82939dd36541189on Stream3073b96e86
TIP
Unsure about what commits and branches are? No worries, you don't need to know what they are to use Speckle! But if you're curious, you can read about them in Core Concepts.
We'll see how branch and commit URLs are used in the following sections.
# Sending Data
Let's look at how we would send some data in Dynamo. First, start by creating a new Send Data node.

In order to select which stream to send data to, you just need to pass a stream URL to the streamUrl port.
Alternatively, you can also use one of the following nodes to create / retrieve existing streams:
NOTE
You cannot send data to a specific commit. Commits are a snapshot of data at a specific point in time and therefore cannot be edited.
# Adding Objects
In order to select which objects to should be sent to your stream, you just need to connect the desired data to the data input in the Send Data node. The node will automatically convert any supported Dynamo objects into a Speckle-compatible format.
# Adding a Commit Message
Although optional, it's considered good practice to add a "commit message" whenever you send you data (especially if working with others). This message should describe the changes being pushed. You can add a commit message by passing any string to the message port.
The commit message will be visible in the Speckle Web App (where you will also be able to edit it).
# Sending Data
With a Stream URL and some data to send, the only thing left to do is to press the Send button. This will begin the process of translating your data to Speckle's object model and uploading it to your Speckle server.
# Viewing a Stream Online
To view the sent stream online you can just right click on the sender node:

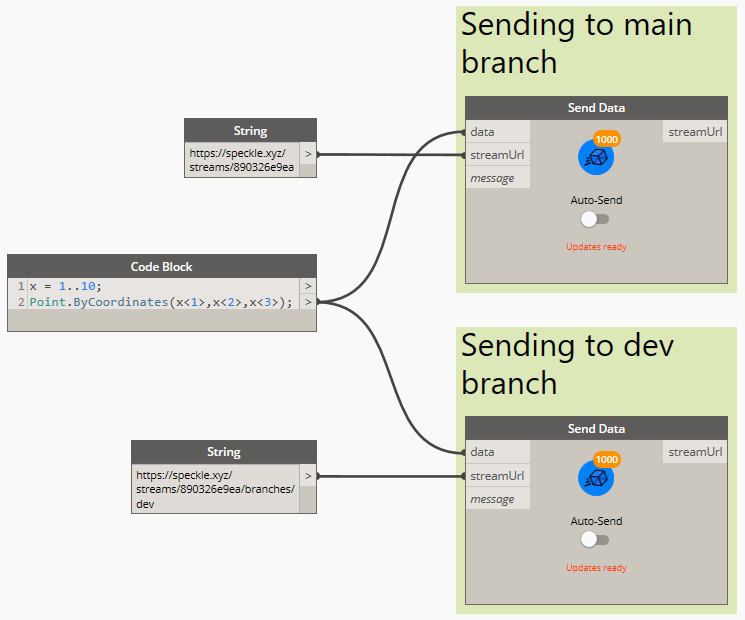
# Sending to a Specific Branch
When using a stream URL, by default, the main branch is used to send and receive data.
To send to a specific branch, simply use the branch URL, such as: https://app.speckle.systems/streams/3073b96e86/branches/dev.
# Receiving Data
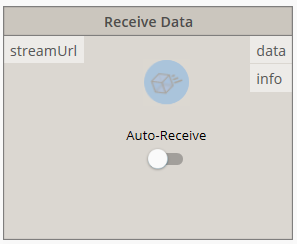
Receiving data is very simple, you just need a Receive Data node, and a stream URL.
When new data is pushed to this stream a notification will appear on the receive node.
# Auto Receiving
By using the toggle on the node, you can enable/disable auto receiving. If enabled, new data pushed to this stream will be pulled automatically as it's available.
# Receiving a Specific Branch
When using a stream URL, the main branch is used to send and receive data by default.
You can also receive data from a specific branch; simply use the branch URL, such as: https://app.speckle.systems/streams/3073b96e86/branches/dev.
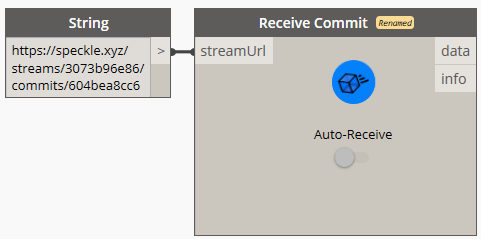
# Receiving a Specific Commit
We've already seen how to retrieve data from streams and branches. It's possible to go even deeper, retrieving data from specific commits. To do this, simply use the commit URL, such as: https://app.speckle.systems/streams/3073b96e86/commits/604bea8cc6
NOTE
When receiving from a commit, the node will stop showing notifications about new activity and the auto-receive toggle will be disabled. This is because commits cannot be edited.
# Receiving a Specific Object
Similarly to commits, you can also point the receive node to a specific object. To do this, simply use the object's URL, such as: https://app.speckle.systems/streams/3073b96e86/objects/df7b8bafccefa791d82939dd36541189.
Like commits, objects in a commit cannot be edited, so the data received using such a URL will always be consistent. You can find the ID of an object from the Speckle Web interface:

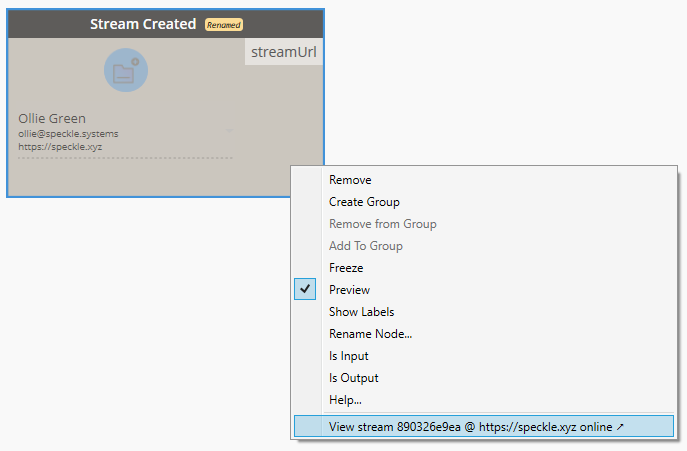
# Viewing a Stream Online
To view the received stream online you can just right-click on the receiver node:
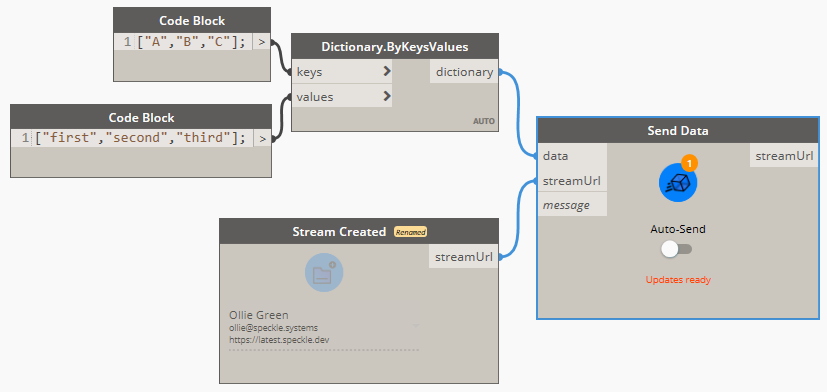
# Creating Custom Objects
A Custom Object is a Base Object with custom properties assigned to it. It's basically a custom data structure you can create to send data in a specific format that you define.
In Dynamo, we use dictionaries to represent custom objects since they are natively supported, so creating custom objects is as simple as creating a dictionary containing the keys and values you wish to include in the Base object.
This dictionary will be automatically converted to a Base object during the Send operation.
TIP
Learn more about the Speckle Base object here 👈
# All Speckle Nodes
# Send Data
The Send Data node performs sending operations. Data is usually sent to a Speckle Server, but the node also supports sending to a different data storage using transports. Whenever possible, the Send node will try to convert any compatible objects into Speckle format.
There is also an switch you can toggle to enable the node to send automatically the data whenever it changes.
# Input
- data: This port will accept almost anything you give it! If the objects provided are not
Baseobjects, it will also perform the conversion to Speckle automatically. - streamUrl: Supports any generated stream from within the
Streamcomponent category, but also stream urls in text format. - message (optional): The message you want to attach to the commit when you send the data. Defaults to
"Dynamo push".
# Output
- streamUrl: The commit url pointing to the objects in the Speckle server.
# Receive Data
The Receive Data node fetches data from a specified Stream or any other valid Transport. Whenever possible, the receiver node will try to convert all Speckle objects into compatible objects.
# Inputs
- streamUrl: The URL of any Speckle stream, branch, commit or object.
# Outputs
- data: Any data that was received from the stream.
# Send Local Data

The Send Local Data node performs sending operations directly to the users's local database.
# Inputs
- data: The data to be sent locally. This port will accept almost anything you give it. If the objects provided are not
Baseobjects, it will also perform the conversion to Speckle automatically.
# Outputs
- localDataId: The unique
idfor the data that was locally sent.
# Receive Local Data

The Receive Local Data node performs receive operations in the same way as the Receive Data node, the only difference is that data is received locally from the Speckle's user local database, instead of the server or any other transport.
# Inputs
- localDataId: The unique
idfor the data you want to fetch locally. This would be provided from a Send Local Data node.
# Outputs
- Data: The data that was received. This port will accept almost anything you give it. If the objects provided are not
Baseobjects, it will also perform the conversion to Speckle automatically.
# Select Account

The Select Account node provides a fast way of selecting different Speckle accounts.
Accounts must be set-up in your computer using the Speckle Manager.
# Create Stream
To create a new stream, right-click on the canvas and search for the Create Stream node. This node has a custom UI that allows you to select a specific account to use, and a button to confirm the stream creation.
TIP
You can also create streams online form Speckle Web. From there you can also set their name, description and permissions.
Once created, the node will remember that stream. Meaning you will not be able to change the stream you created, or create a new one using the same node (to do this, just place a new Create Stream node).
Select the appropriate account and press the blue button. If the stream creation was successful, the output of the node should be a stream url pointing to the newly created stream and linked to the specified account.
# Viewing the Stream online
To view the newly-created stream online you can just right click on the node:
# Inputs
This node has no inputs.
# Outputs
- streamUrl: A URL, pointing to the newly-created stream.
# Get Stream

The Get Stream node will try to retrieve an existing Stream, given its URL and a specific account to access that stream with. This may be useful if there are multiple accounts registered on the same machine and a certain stream requires a specific account to be accessible.
# Inputs
- streamUrl: The URL of any Speckle stream, branch, commit or object.
- account (optional): A Speckle account, provided by the Accounts node. If no account is provided, the default account will be used.
# Outputs
- stream: A
Streamobject pointing to existing stream. If the stream doesn't exist, an error will be shown.
# List Streams

The List Streams node returns a specified amount of streams available in an account. For performance reasons, it has been limited to fetching a maximum of 20 streams.
# Inputs
- account (optional): A Speckle account, provided by the Accounts node. If no account is provided, the default account will be used.
- limit (optional): The number of streams to fetch from the server.
# Outputs
- streams: List of
Streamobjects available to the specified account.
# Stream Details

The Stream Details node returns all relevant information related to a specific Stream.
# Inputs
- stream: Supports any generated stream from within the
Streamcomponent category, but also stream urls in text format.
# Output
- stream: The unique
idthat identifies the stream. - name: The name of the stream.
- description: The description of the stream.
- createdAt: The date this stream was created.
- updatedAt: The date marking the last time the stream was updated.
- public: Boolean value indicating if the stream is public or private.
- collaborators: A list of collaborators that have access to this stream, as well as their roles.
- branches: A list of available branches for this stream.
# Update Stream

The Update Stream node allows for updating a stream's name, its description and whether it is public (publicly available to read by anyone with the stream url) or private (only invited collaborators can view this stream).
# Inputs
- streamUrl: The URL of a stream, branch, commit or object.
- name (optional): Text string with the new name for the stream.
- description (optional): Text string with the new description for the stream.
- isPublic (optional): Boolean value to activate/deactivate this stream's link sharing.
# Output
- streamUrl: The URL of the updated stream.
# Developer Tools
These nodes were developed exclusively for testing/development purposes. If you don't know what these are, you most likely won't ever need them.
# Convert to Speckle

The Convert to Speckle node will convert any supported objects (such as lines, curves, meshes...) into Speckle ones.
This node was developed for testing/development purposes, as the Send/Receive nodes will already perform this conversion step automatically.
# Convert to Native

The Convert to Native node will convert any supported Speckle objects into compatible objects.
This node was developed for testing/development purposes.
# Serialize to JSON

The Serialize to JSON node will convert any Speckle object into JSON formatted text.
# Deserialize from JSON

The Deserialize from JSON node will convert a serialized Speckle object in JSON format into Base Speckle objects.
# Server Transport

Creates a connection to a specific Speckle Server.
# SQLite Transport

Creates a connection to a specific SQLite database.
# Disk Transport

Creates a connection to a specific file in the computer's disk, where the data will be saved in JSON format.
# Memory Transport

Creates a connection to in-memory storage.
# Supported Elements
← Grasshopper Unity →